A tour of our Kanban board
In this post I’m going to give a quick run through the Kanban board that my team uses at LateRooms.com. This is not a ‘thou shalt do it this way’ article, it is intended to demonstrate a working board and explain its structure. Also, I must stress that this is the current state of the board at the time of this post was written, so it has probably evolved again by now!
The board

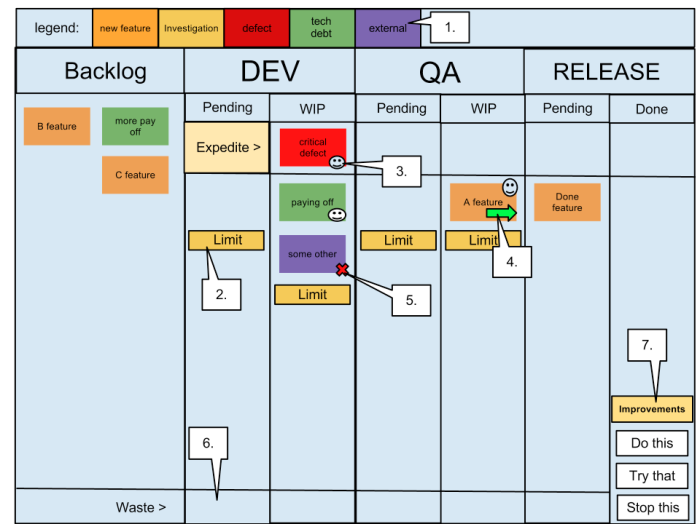
The board is split into 4 sections:
- Backlog -> For the Business Analyst (BA) to add and prioritise tickets
- DEV -> contains the queue (pending) and work in progress (WIP) columns for development work.
- QA -> contains pending and WIP columns for QA-ing (AKA testing)
- RELEASE -> has a column for pending release and a column for released (done)
When a ticket is ready for development, the BA will place the task into the DEV pending column. This is now available to be pulled through development and QA-ing until the ticket is eventually released onto the live estate. Tickets are not allowed to go back, so if an issue is discovered in QA-ing the ticket will remain in the QA until the issue is resolved.
The board has an expedite swim lane for the tracking of high priority tasks. Any urgent tickets can be placed and pulled along this row until they are eventually released in an emergency fix. There is no pending DEV column in this swim lane, as tasks critical enough to be expedite should not sit in a pending DEV column.
The other features of the board (labelled 1 to 7) are:
- Legend – This shows the types of cards (by colour) that can be on the board, these include New features, Tech debt, Defects, Investigations (support) and External Issues (e.g. new servers). The purpose of this is to clearly visualise the type of work that is being processed
- Limits – Each pending and work in progress column has a limit to control the amount of work that can be taken on. These limits are set based on resource levels and other bottlenecks, and are intended to encourage the PULLING of work when capacity exists rather than continuing to force more work onto a bottleneck.
- Avatar – Each team member has ONE avatar to place on the item they are on, this tells other team members that this card is being worked upon and should be progressing. As we pair on most development, there will often be more than one avatar on each Dev task.
- Arrows – Indicate movement of tasks since the last standup, again this is part of the visualisation of the process. These cards are often ignored at the standup, as we want to focus on the items that are not progressing, such as…
- Blockers – We want to minimise blockers as they cause more bottlenecks in the system, so we clearly indicate these items with blocked avatar. An additional requirement to blocking a card is to add the details of WHO and WHY the item is unable to proceed.
- Waste – Tasks can be abandoned at any stage in the process, we collect these and review at the weekly retrospective.
- Continuous Improvements – Also, at the weekly retrospective we decide upon three improvement points that we want to tackle for the following week. These are summarised on the board and recalled at the beginning of the morning standup, if we fail to make any progress on an improvement then it may be rolled over to the next week.
